

How to install Jasperserver 5.6.0 in CentOS 7?
Procedure of Jasperserver installation in CentOS 7.
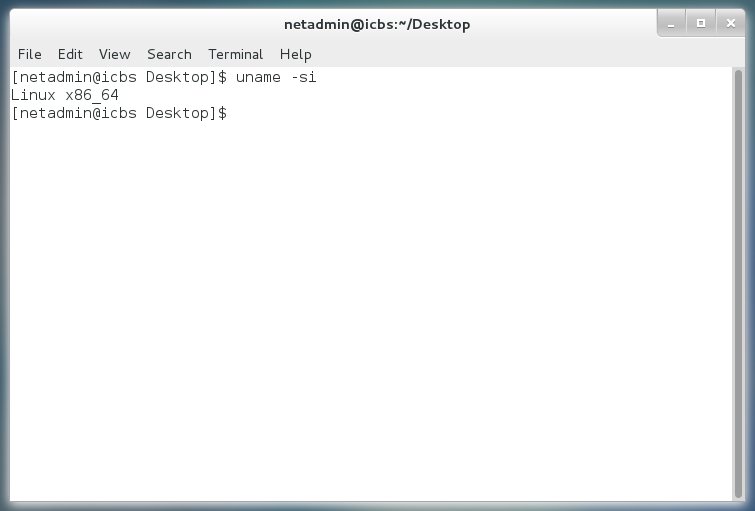
1.Type the uname -si in Terminal to check if your CentOS is 32 or 64 bit. If x86_64 it means your CentOS is 64 bit or i386 for 32 bit. Linux version Click this link to download the Jasperserver Linux installer that supported your CentOS.
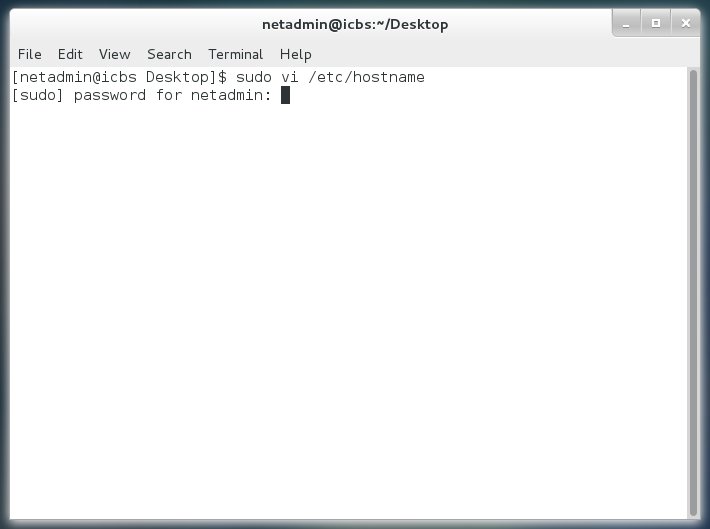
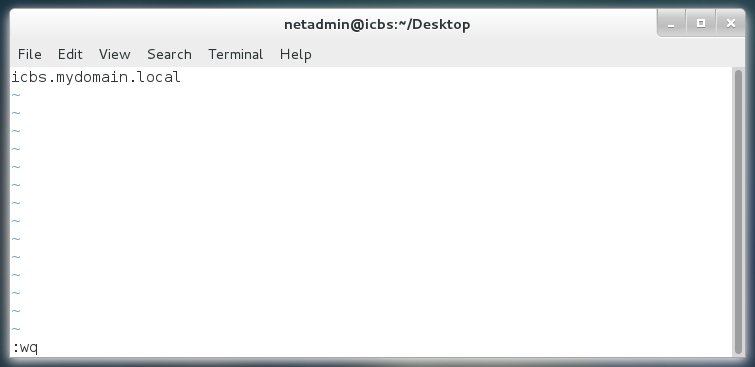
2. Edit hostname file using the vi command in Terminal, type sudo vi /etc/hostname and enter then type the password for administrator access. The password is not displayed when you type to secure the secrecy.
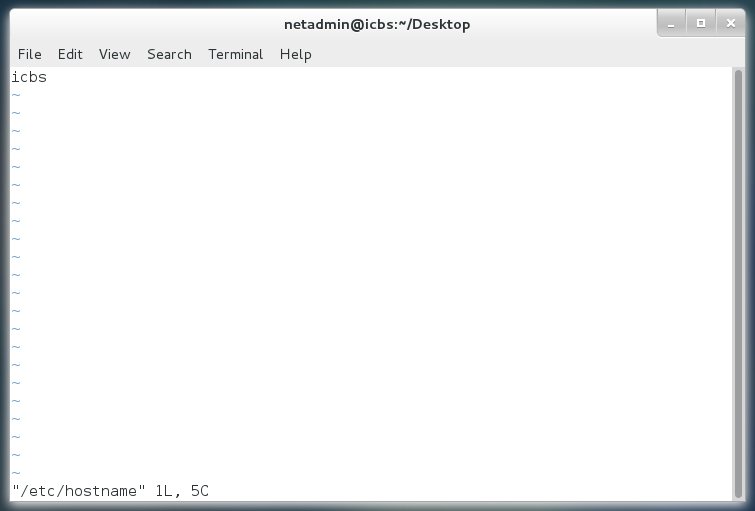
3. In the hostname file, click button i in keyboard to edit. i means insert command.
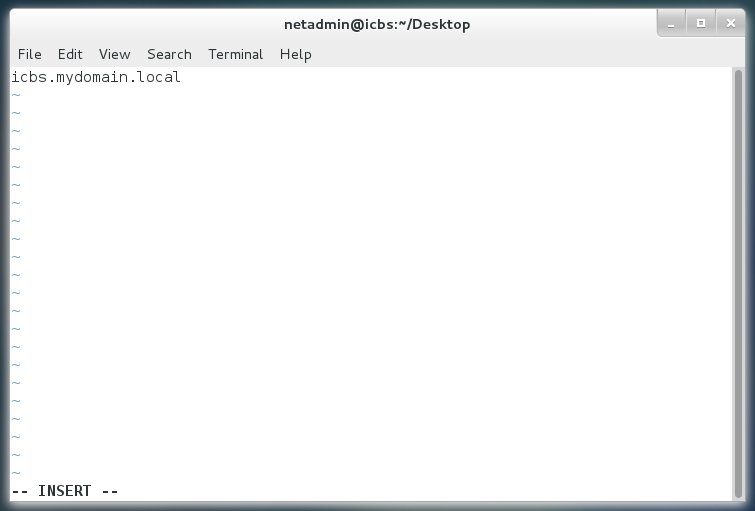
4. Type your domain name, for example icbs.mydomain.local to prevent the error in installation of Jasperserver.
5. Click Escape (Esc) button, type wq then click enter button to save your new hostname file. Dont interchange the w and q because w command means write and q means quit.
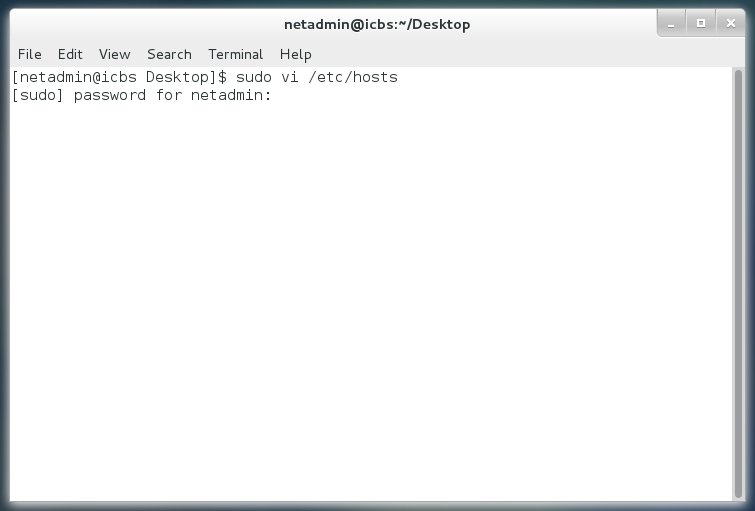
6. Type the sudo vi /etc/hosts, and click enter button then type the password of administrator user.
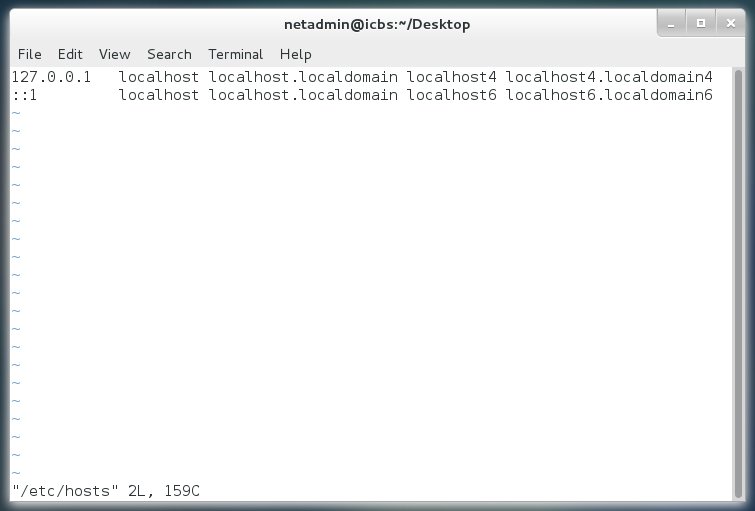
7. The screen shot below is the default file of hosts, if the CentOS is newly installed.
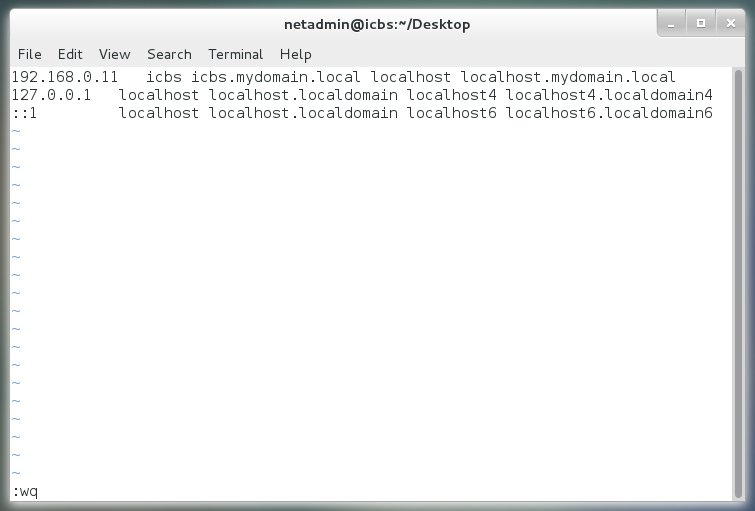
8. Follow the procedure above how to edit file using vi command. The screen shot below is the new setup to properly install the Jasperserver Linux installer.
9. Run the Jasperserver Linux installer using sudo command or root user. Type cd /home/Username/Downloads click enter, type sudo ./jasperreports-server-cp-5.6.0-linux-x64-installer.run and then enter to run.

10. The Jasperserver setup wizards will display, click next button to continue installation.

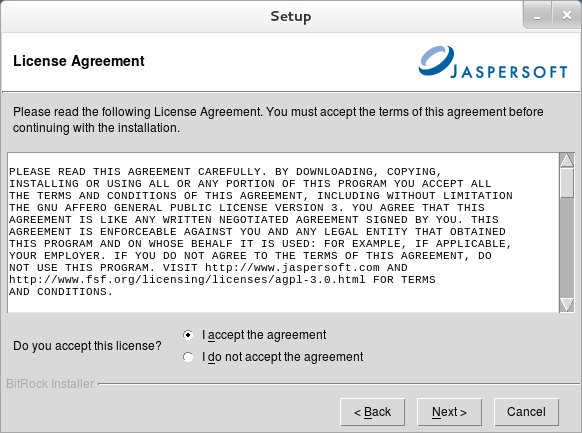
11. In the License Agreement, choose I accept the agreement and click next button to continue.
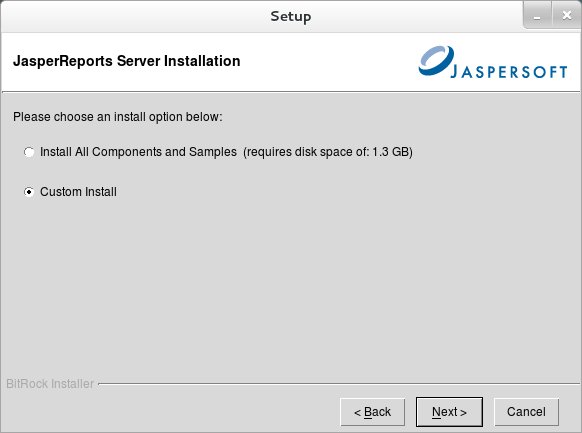
12. In the JasperReports Server Installation page, choose Custom Install then click next button.
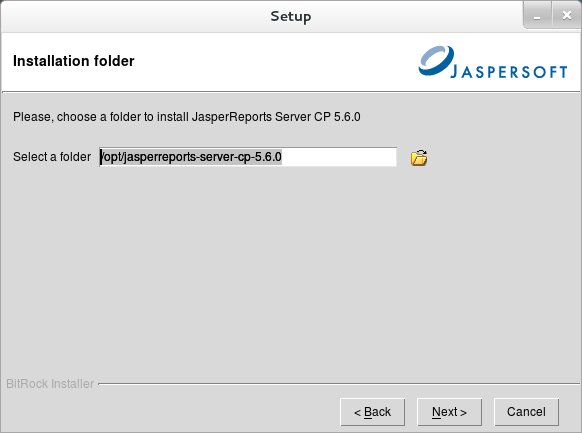
13. In the Installation folder page, the default installation of Jasperserver is opt folder. Click next to continue installation.
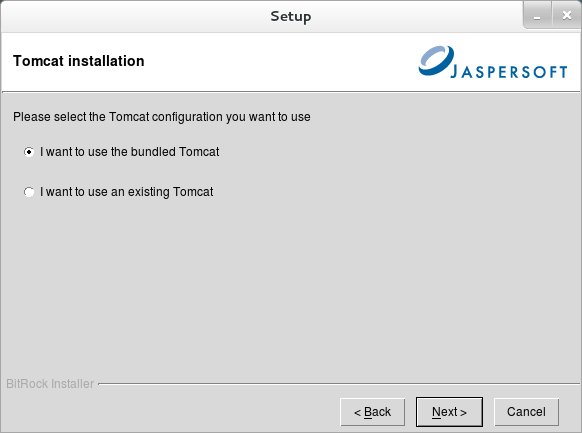
14. In the Tomcat installation page, if you have existed Tomcat in your computer choose the “I want to use an existing Tomcat.” but if you don’t have choose the other one and then click the next button to proceed.
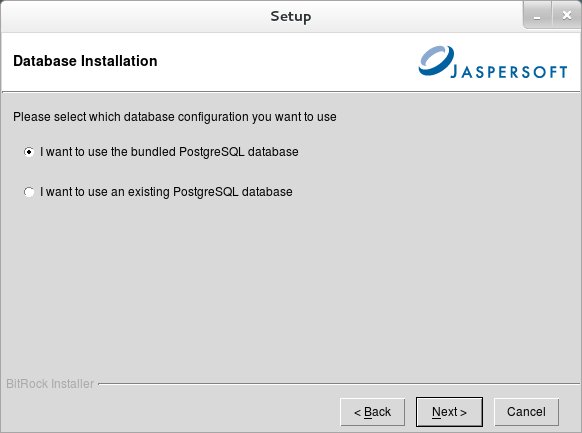
15. In the Database Installation page, I choose the bundled PostgreSQL database to install and click the next button to continue.
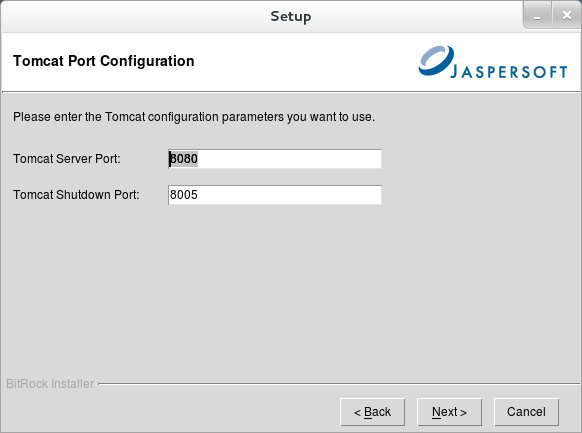
16. I choose the bundled Tomcat so that the Tomcat Port Configuration page was displayed, click the next button for the following page.
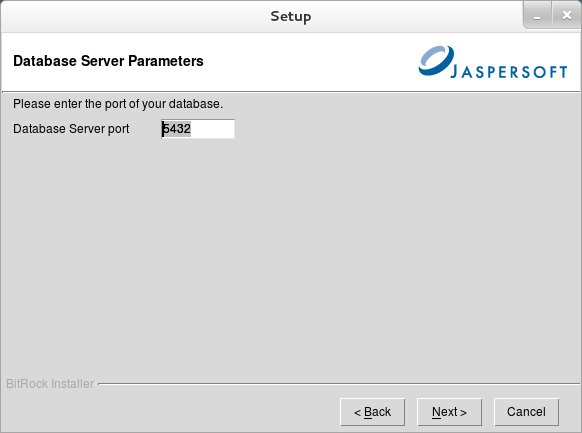
17. In the Database Server Parameters, click the next button to continue because the default server port of PostgreSQL 5432 is already input.
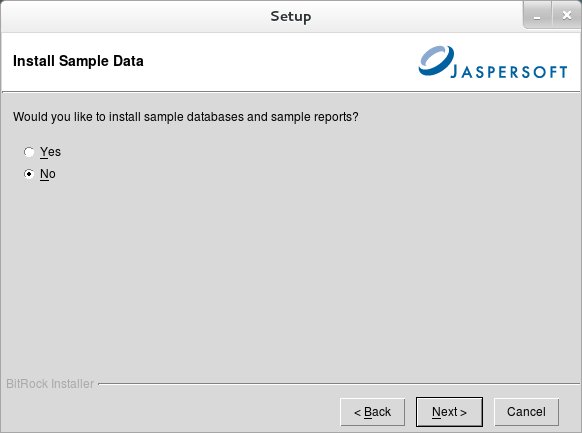
18. In the Install Sample Data page, choose Yes, if you want to install sample database and reports for your Jasperserver or no if you don’t want then click next button.
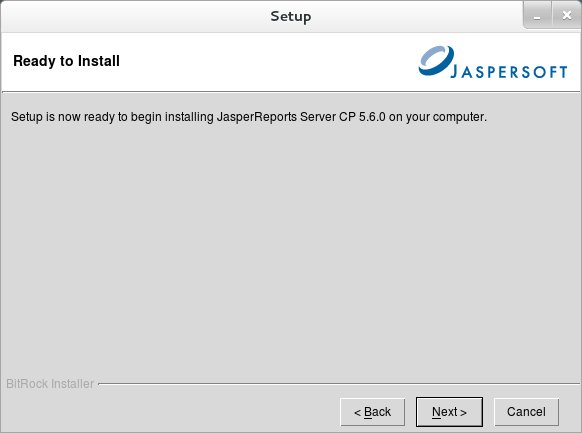
19. The next page is Read to Install, click next button to proceed the installation.
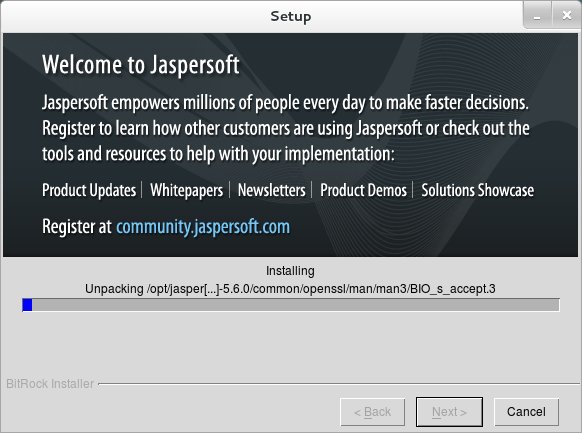
20. The Installation page was displayed. Please wait until the installation is done.
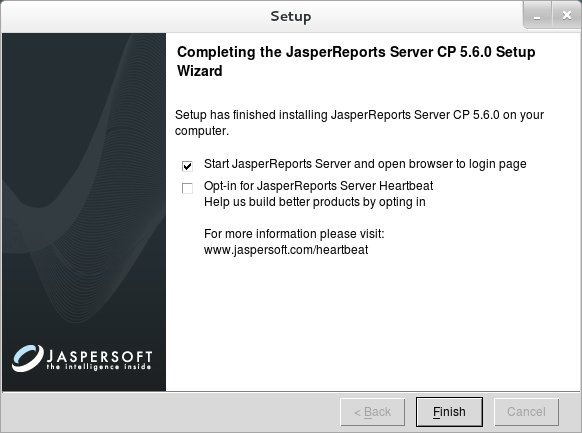
21. Click the Finish button to Start JasperReports Server and open browser to login page.
22. The Welcome and Login page of JasperReport Server will displayed and ready to use.
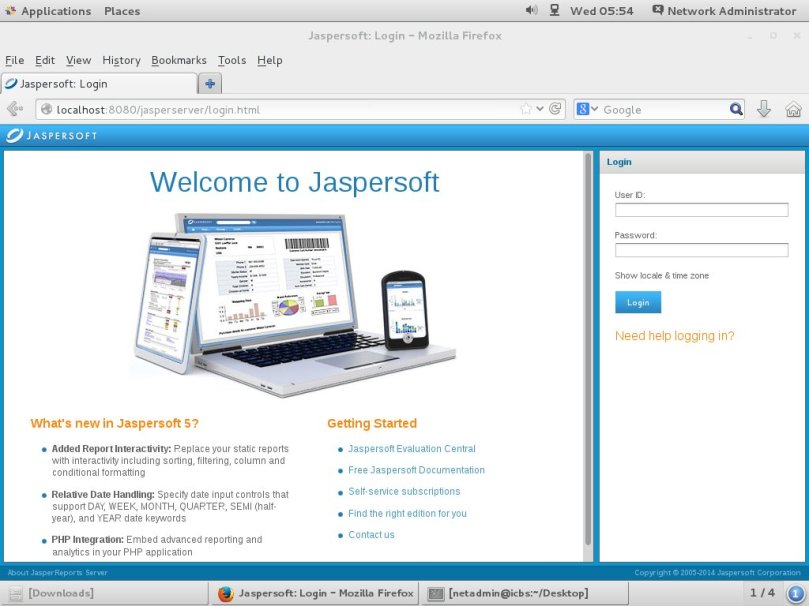
Login using the default username and password
•username: jasperadmin
•password: jasperadmin
How to install Postgresql 9.2 and enable Remote Connection
Installing Postgresql 9.2 zip file and Remote Configuration
Requirement for Postgresql Installation
1. Microsoft Visual C++ 2008 redisbutable
2. postgresql-9.2.9-1-windows-binaries.zip
Setup the PostgreSQL
1. Unzip the postgresql-9.2.9-1-windows-binaries.zip file in the C:\Program Files directory. the default folder is pgsql.
2. Create data folder in c:\Program Files\pgsql\ directory.
3. Open the command prompt, type cd\ then enter and type the cd “Program Files\pgsql\bin” then enter to continue.
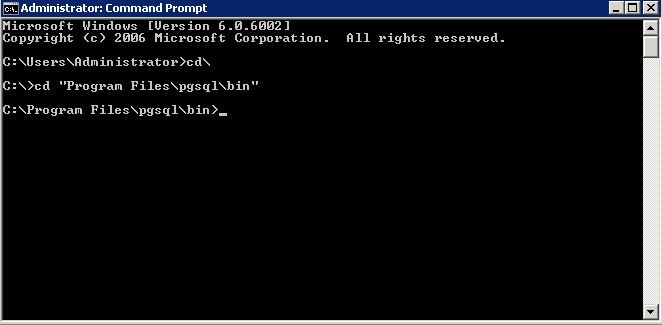
4. Type the initdb -U postgres -W -E utf8 -D “Program Files\pgsql\data” then enter to continue.
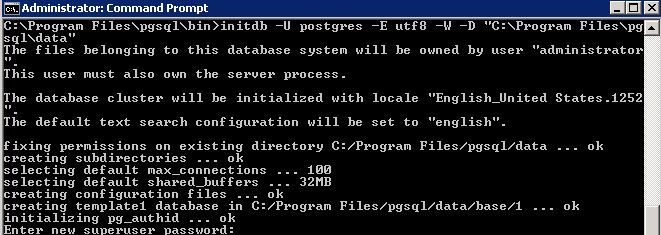
It will get new password for postgres because of -W in the command then enter your new password for postgres.

Enter again your new password for postgres.

finish installing your new postgres in data directory.
Configure pg_hba.conf and postgresql.conf
1. Edit the line 59 to 63 from postgresql.conf, uncomment the listen_addresses and port by removing the # and change the localhost to * then save the file.
Not Configure postgresql.conf file

Configured postgresql.conf file

2. Add the IP address of your postgresql server below of line 84 in the pg_hba.conf and save the file.

Add the postgresql in the services
1.Open the command prompt, type cd\ then enter and type the cd “Program Files\pgsql\bin” then enter to continue.
2. Type the pg_ctl register -N “postgresql” -D “C:\Program Files\pgsql\data” command then enter to finish.

3. You can Start and Stop the services after service registration using the command.
net stop postgresql and net start PostgreSQL.

How to install MS SQL Server 2008 R2 in Windows Server 2008 x86
Installing MS SQL Server 2008 R2 in Windows Server 2008 32-bit
Requirement for MS SQL Server 2008 R2
1. Windows Installer 4.5
2. .Net Framework 3.5 SP1
3. MS SQL 2008 R2 installer
Note:
Install the Windows Installer 4.5 and .Net Framework 3.5 SP1 before you install the MS SQL Server.
Installing MS SQL Server 2008 R2
1. Open the MS SQL Server Installer to extract.

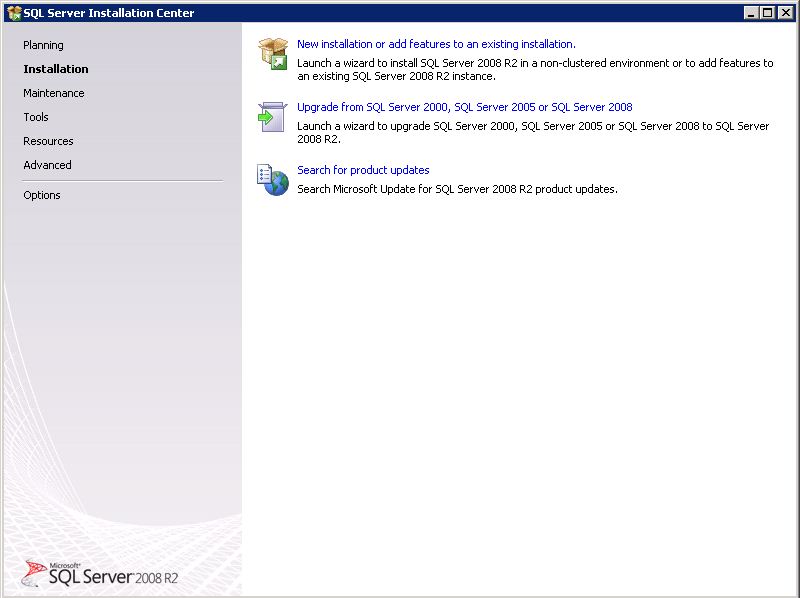
2. The SQL Server Installation Center, click the New installation or add features to an existing installation to continue.
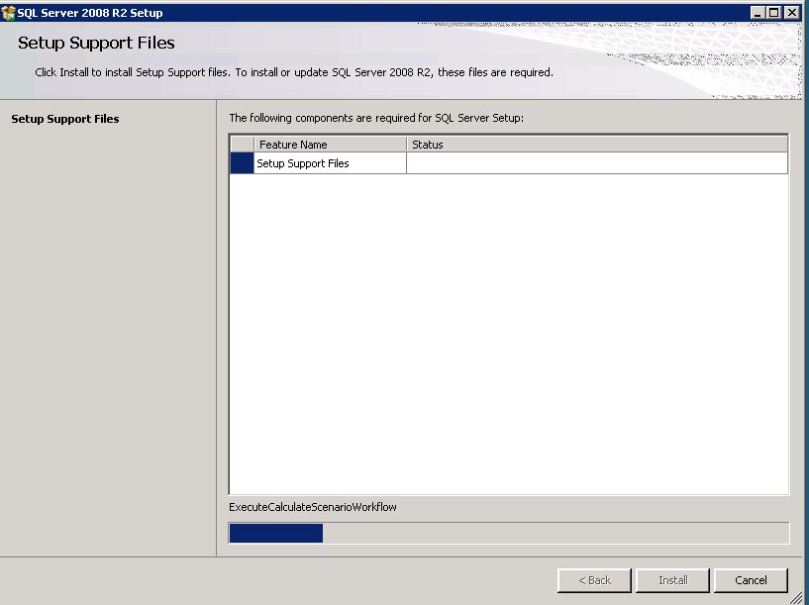
3. The SQL Server 2008 R2 Setup Support files will display,
4. In SQL Server 2008 R2 Setup, check the I accept the license terms and click Next button to display next page.

5. In the Feature Selection, select the features of your SQL Server, Database Engine Services and Management Tools – Basic and click Next button to continue. You can remove and other features by running again the MS SQL Server installer.

6. If your Windows Power Shell is not installed it will display failed. Install the Windows Power Shell then try to click the Re-run button to check again and then click next button to display next page.

7. In Instance Configuration page, type the name instance of MS SQL you want or select Default instance and then click next button to continue.

8. In Server Configuration page, Change the Account Name into NT AUTHORITY\SYSTEM for two Services and then click next button to display next page.

9. In the Account Provisioning of Database Engine Configuration page, select Mixed Mode for Authentication Mode to used sa account and type your password for your system administrator (sa) account then click next button to display next page.

10. In the Error Reporting check the check box to send Windows and MS SQL Server Error report to Microsoft or unchecked if you don’t want then click next button to display Installation progress page.

11. Wait for the finishing of Installation in the Installation Progress.

12. After the Installation Progress, the Complete page will display the successfully completed installation of MS SQL Server.

How to migrate Bitnami Redmine into another server?
Migrating Bitnami Redmine into another server or host.
1. First of all backup your Redmine database using mysql console or phpmyadmin.
*** Using mysql console ***
A. Click start button, type cmd, right click and select run as administrator.

B. Click continue button to run command prompt as administrator.

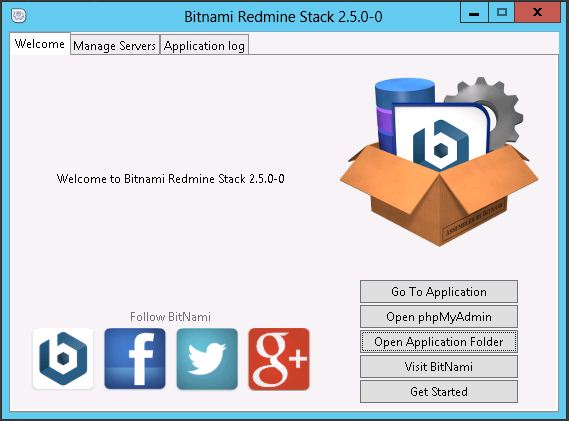
C. In the Bitnami Stack Manager then click Open Application Folder button to continue.
D. In the Application Folder of Bitnami Redmine then click the user_redmine.bat.

E. In the Bitnami Redmine console, type the following command.
cd mysql
mysqldump -u dabase_user -p database_password redmine_database > redmine_backup.sql

F. The Redmine database backup will find in the folder of mysql bin. “C:\Bitnami\redmine-2.5.0-0\mysql\bin”
*** Using phpMyAdmin ***
A. In the Bitnami Redmine Stack Manager, click the Open phpMyAdmin button to access redmine database using phpmyadmin.
B. In the phpMyAdmin, type the mysql user and password to access the database.

C. In the left pane of phpMyAdmin localhost, click the database of Redmine then click the Export to backup the database.

D. In the Exporting tables from Redmine_database, click go button to continue the database backup.

E. The Redmine database backup will find in the download folder.
2. Backup a copy of data from directory of mysql and redmine folder from the apps directory.


3. Install the Bitnami Redmine into another host or server and if you have plugins from the old Redmine host then install it.
4. Restore the database from the old server to new mysql server. You can restore the database using the mysql console or phpmyadmin.
Follow the procedure above using the mysql console.
A. In the step five of procedure using the mysql console, type the command below.
cd mysql
mysql -u database_user -p
B. enter your database password
drop database bitnami_redmine;
C. then create new database to restore the old database.
create database redmine;
exit;
Drop and Create database using mysql console

D. After you create and exit in the mysql, type the command fro restoring database backup.
mysqldump -u root -p redmine < redmine_backup.sql
Restore the database backup using mysql console

Note: Make sure that your database backup is located in mysql directory. “C:\Bitnami\redmine-2.5.0-0\mysql\redmine_backup.sql“.
Follow the procedure above using the phpMyAdmin.
A. After selecting the Redmine database from the left pane, click Operation menu.

B. Ensure that bitnami_redmine database is selected before you click the drop the database button.

C. Click Ok button to totally drop the bitnami_redmine database.

D. After the dropping of bitnami_redmine database, create new database for restoration of the old database. Select Databases from menu, type the name of new database, then click create button.

E. In the new created database, select the import, then click the choose file button to import the old database.

F. Select the old database base to import in phpMyAdmin, then click the Open button to continue.

G. Ensure that you choose the correct database file of Redmine before you click the Go button.

H. The message “Import has been successfully finished, 69 queries executed.” means your old database is successfully restored.

5. After the restoration of old database redmine, from the step B. copy the data and redmine folder to the new Redmine host to completely migrate to the new server.
6. After the replacement of the data and redmine folder, rename the ERR and PID file from the data folder base in the computer name of new host.

7. Change the configuration of database.yml in the ” F:\Bitnami\redmine-2.5.0-0\apps\redmine\htdocs\config\database.yml ” right click the database.yml then select edit to configure database connection.
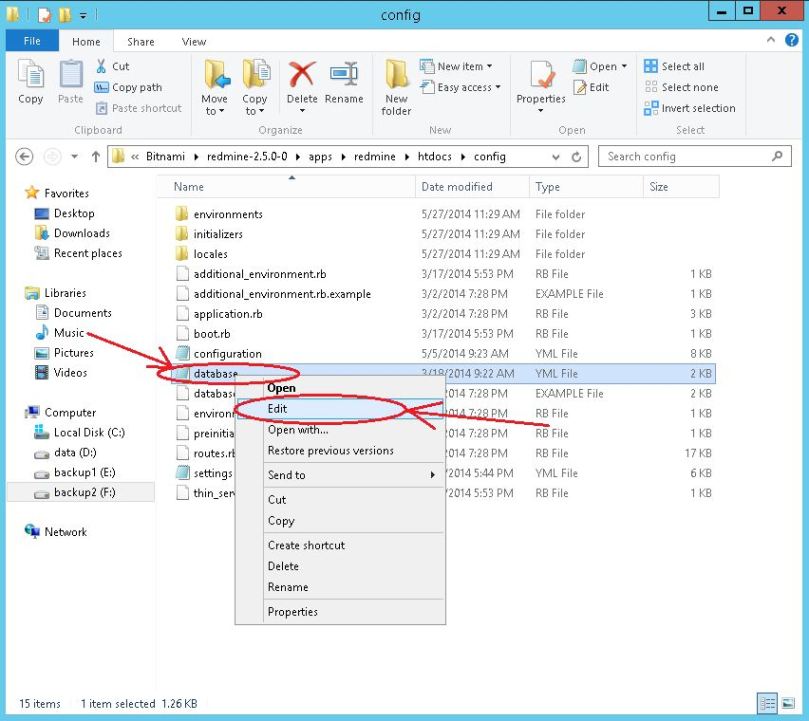
8. In the database.yml, change the production: base in your new setup database server. Setup the database_name of your Redmine, database_user and database_password with full privileges in the Redmine database.

9. In the Bitnami Redmine Stack Manager, click the Restart All to take effect all the changes.

The migration of Bitnami Redmine into another host is finished.
How to configure svn of Redmine using Basic Authentication?
Basic Authentication option of configuring Subversion in Bitnami Redmine for Repositories access control.
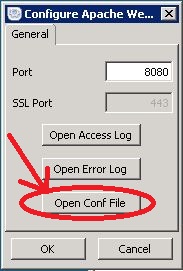
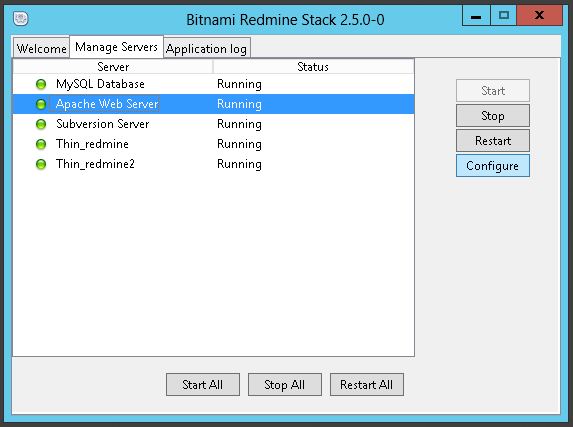
1. In Bitnami Redmine Stack, click the Manage Servers tab and choose Apache Web Server then click Configure button to continue.

2. In the Configure Apache Web…, Click Open Conf File.
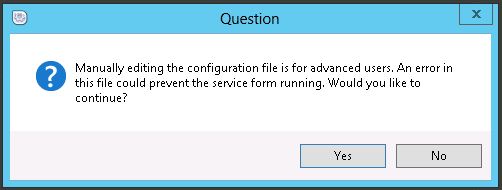
3. Click the yes button in the Question wizard to continue in configuration file.

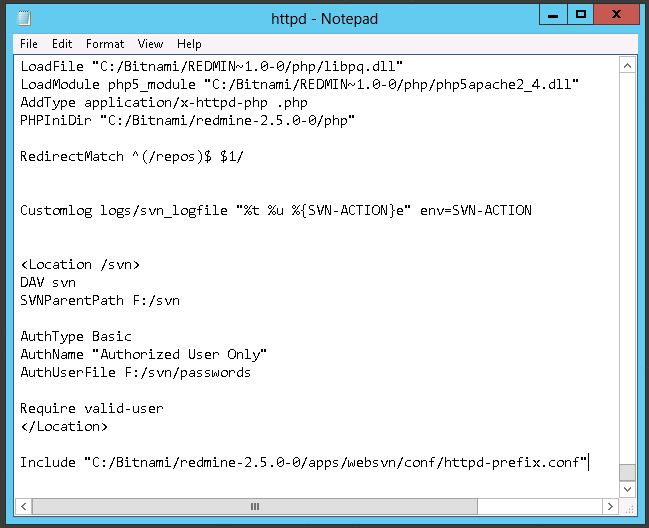
4. In the Apache configuration file, add the script below for Basic Authentication of Subversion.
LoadModule dav_svn_module modules/mod_dav_svn.so
LoadModule authz_svn_module modules/mod_authz_svn.so

<Location /svn>
DAV svn
SVNParentPath F:/svn

AuthType Basic
AuthName "Authorized User Only"
AuthUserFile F:/svn/passwords

require valid-user
</Location>
5. Restart the Apache Server.
How to add new Apps in Bitnami Stack Manager?
Bitnami Stack Manager custom for new application.
1. In Windows Server 2012, click start button, type Bitnami or the name of your apps and click the Bitnami Stack Manager of Redmine.

2. In the Bitnami Stack Manager, click the Open Application Folder button, go to the apps folder and make a new folder for the new application.

4. Name the apps folder base on your application.

5. In the new folder apps, create folder name conf for configuration to apache and name htdocs for root folder of your application.

6. Go to the “apps/phpmyadmin/conf/“, copy the http-app.conf and http-prefix.conf file and paste to the conf folder of new apps.

7. Edit the httpd-app.conf based in the directory folder of your apps and permission to access the new apps.
Defult httpd-app.conf of phpmyadmin

httpd-app.conf of websvn apps

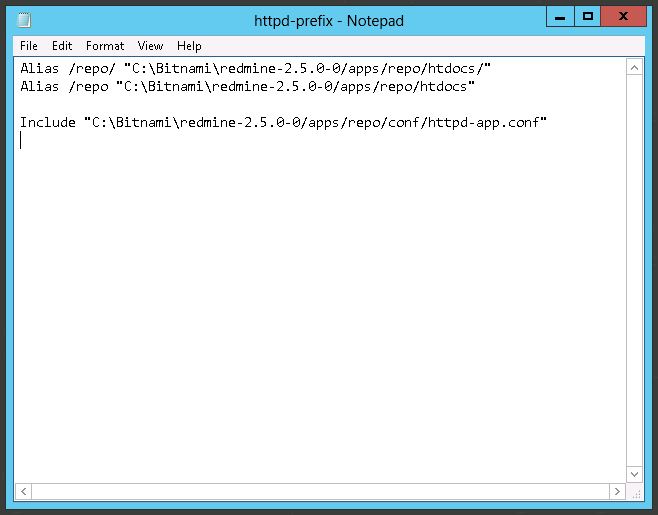
8. Edit the httpd-prefix.conf in the alias of your apps and the directory of it.
9. Copy or extract all the files of your new apps in the htdocs folder created a while ago.


10. Include the httpd-prefix.conf directory of new apps at the bottom of Apache httpd.conf to run your new apps using bitnami stack manager. Type the include “C:/Bitnami/redmine-2.5.0-0/apps/websvn/conf/httpd-perfix.conf” .
Click the Apache Web Server then click the Configure button.
Click the Open Conf File button.

Click Yes button to continue editing the Apache httpd.conf.
httpd.conf of Apache configuration
11. In Bitnami Redmine Stack, click Apache Web Server and click the Restart button to apply the changes in httpd.conf.

How to know the Authenticated user and Base DN of your LDAP Server?
Authenticated user in LDAP Server and Base DN in Windows Server 2008.
1. Click the start button, type “ldp” and click the program ldp.

2. In the ldp, click Connection and click Connect.. to continue.

3. In the connect wizard, type the hostname or IP of the LDAP Server then click the Ok button.

4. In the ldap wizard, after the connection was successfully, click the Connection menu and click the Bind.. to continue.

5. In the Bind wizard, input the user@YourDomain and password then click Ok button to continue.

6. After the simple bind using the user with admin privilege, you will see that the user was Authenticated for LDAP Server.

Base DN of OU in Active Directory of Windows Server
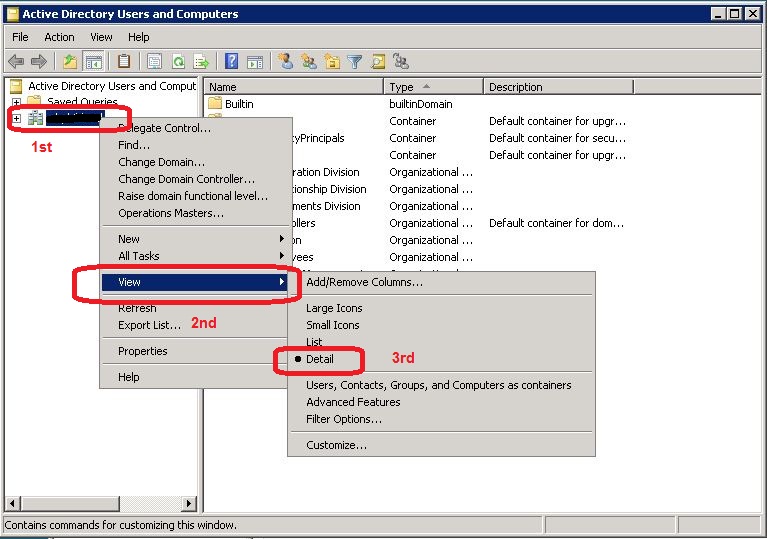
1. In the Active Directory, right the Domain, choose view and click Detail.
2. In the Active Directory, right click the OU you want to know the Bind DN and click the properties to continue.

3. In the properties of OU, click the distinguishname to get the Bind DN.
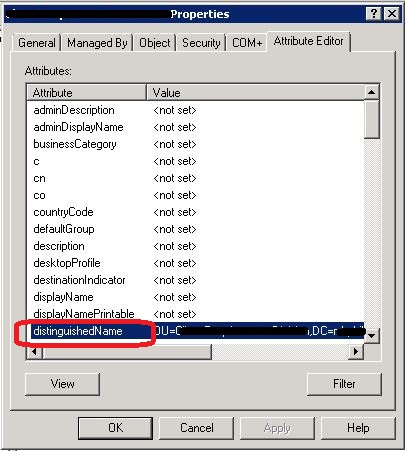
4. In the String Attribute Editor, copy the Value of distinguishedName of OU for Bind DN that you use to setup the LDAP Server.

How to use Active Directory of Windows Server in Redmine LDAP?
Activating LDAP synchronization of Redmine plugin to sync users from Active Directory to Redmine.
1. I’m using Bitnami as a Server of my Redmine, click start button and click Use Bitnami Redmine Stack cmd.

2. In Bitnami Redmine Stack cmd, clone the redmine_ldap_sync in github.com of Thorin or direct download and follow the procedure of Thorin. In the directory ..redmine\htdocs\plugins\ type the command
git clone git://github.com/thorin/redmine_ldap_sync.git

3. If the cloning is successful, you can update the ruby gems in the directory ..redmine\htdocs\plugins\ by typing
bundle install
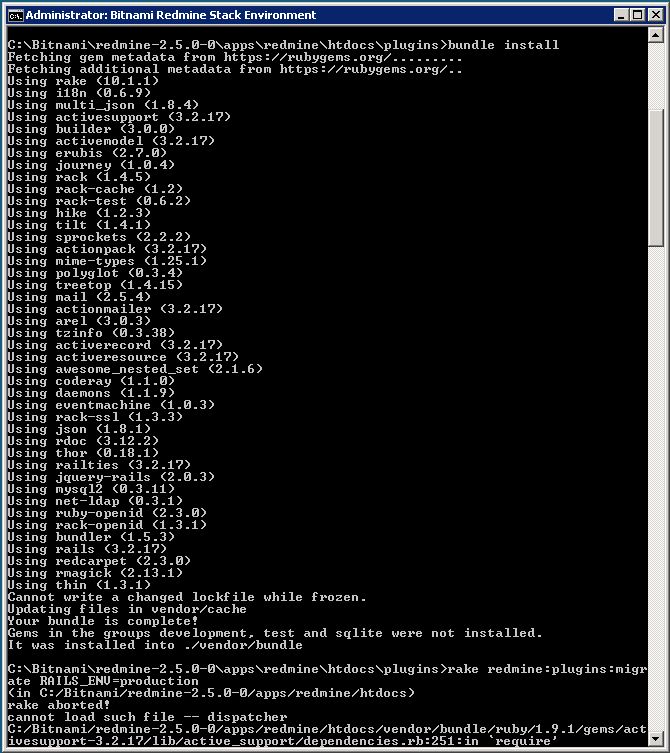
4. After updating the ruby gems, install the rake 10.1.1 under the directory ..redmine\htdocs\plugins\ because You will encounter the error of “rake aborted!“. To install Rake 10.1.1 type the command
gem install rake -v 10.1.1
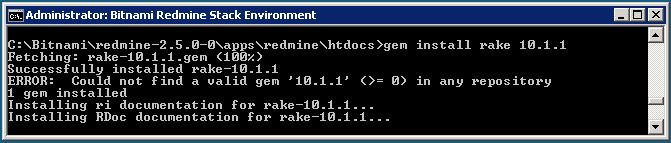 Successfully installed rake-10.1.1, never mind the error display because under the error 1 gem installed is display.
5. In the directory ..redmine\htdocs\plugins\, migrate the database using the command
rake redmine:plugins:migrate RAILS_ENV=production

6. After migrating the database, install the plugin redmine_ldap_sync by typing command
rake -T redmine:plugins:ldap_sync RAILS_ENV=production

7. Restart the Redmine services in the bitnami Manage Servers by clicking Restart All.

8. After restarting the all servers, login as administrator in Redmine, click Administration, in the left menus click LDAP Authentication and click new Authentication Mode or edit your existing.

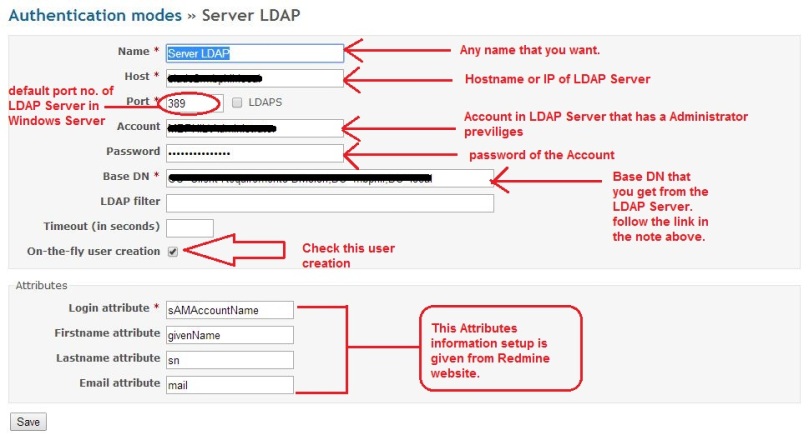
9. In the LDAP Authentication Modes, see my setup below for your reference and save your setup then don’t forget to follow the link in the step 7 note above.
10. After the Authentication modes, back to Administration page and click the LDAP synchornization in the menus. see my setup page below.

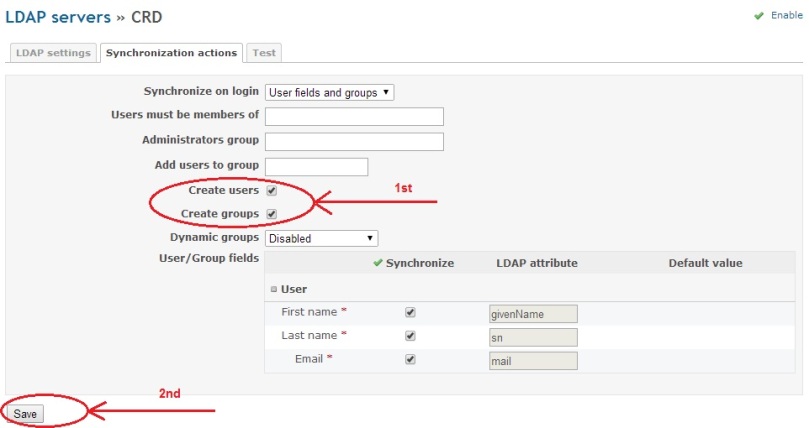
11. After the LDAP settigs, click the synchronization tab then save your setting. see my setting below.
12. After the Synchronization page, click the Test tab and click the generate to test the connection from LDAP Server. see my testing page below.

How to create RD CAP and RAP in RD Gateway Manager?
Creating RD CAP and RAP in RD Gateway Manager
1. click the Server manager icon below to display.

2. In the Server Manager, Click Tools, Terminal Services and click Remote Desktop Gateway Manager to open RD Gateway Manager.

3. In the configuration status of RD Gateway Manager, no RD CAP and RD RAP is configure, click green with right arrow to create RD CAP and RAP.

4. In the General tab of RD CAP, type Policy name and click Requirements Tab to add the Domain group as Requirements of RD CAP.

5. In the Requirements Tab of RD CAP, click Add Group button to add the Domain Group.

6. In the Select Group, type Domain Admins the Check Names and click Ok button to Add group.

7. You will see that the Domain Admins

